![[轮子系列]Google Guava之BloomFilter源码分析及基于Redis的重构](/content/images/size/w450h450/2018/06/the-bloom-filter-e1506680747852.jpg)
一、背景知识
在网上已经有很多关于布隆过滤器的介绍了,这里就不再赘述,下面简单地提炼几个要点:
- 布隆过滤器是用来判断一个元素是否出现在给定集合中的重要工具,具有快速,比哈希表更节省空间等优点,而缺点在于有一定的误识别率(false-positive,假阳性),亦即,它可能会把不是集合内的元素判定为存在于集合内,不过这样的概率相当小,在大部分的生产环境中是可以接受的;
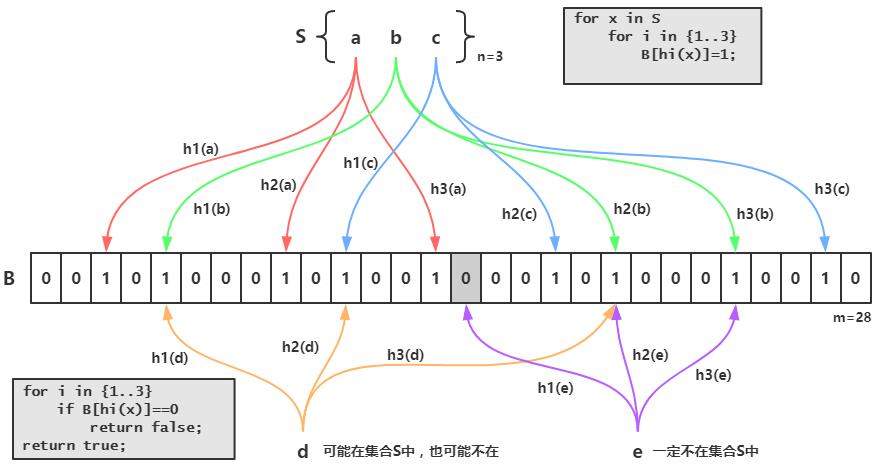
- 其原理比较简单,如下图所示,S集合中有n个元素,利用k个哈希函数,将S中的每个元素映射到一个长度为m的位(bit)数组B中不同的位置上,这些位置上的二进制数均置为1,如果待检测的元素经过这k个哈希函数的映射后,发现其k个位置上的二进制数不全是1,那么这个元素一定不在集合S中,反之,该元素可能是S中的某一个元素(参考1);
- 综上描述,那么到底需要多少个哈希函数,以及创建长度为多少的bit数组比较合适,为了估算出k和m的值,在构造一个布隆过滤器时,需要传入两个参数,即可以接受的误判率fpp和元素总个数n(不一定完全精确)。至于参数估计的方法,有兴趣的同学可以参考维基英文页面,下面直接给出公式:
- 哈希函数的要求尽量满足平均分布,这样既降低误判发生的概率,又可以充分利用bit数组的空间;
- 根据论文《Less Hashing, Same Performance: Building a Better Bloom Filter》提出的一个技巧,可以用2个哈希函数来模拟k个哈希函数,即gi(x) = h1(x) + ih2(x) ,其中0<=i<=k-1;
- 在吴军博士的《数学之美》一书中展示了不同情况下的误判率,例如,假定一个元素用16位比特,8个哈希函数,那么假阳性的概率是万分之五,这已经相当小了。
首先我们来了解一下一些已经有相应实现的开源类库,如Google的Guava类库,Twitter的Algebird类库,和ScalaNLP breeze等等,其中Guava 11.0版本中增加了BloomFilter类,它使用了Funnel和Sink的设计,增强了泛化的能力,使其可以支持任何数据类型,其利用murmur3 hash来做哈希映射函数,不过它底层并没有使用传统的java.util.BitSet来做bit数组,而是用long型数组进行了重新封装,大部分操作均基于位的运算,因此能达到一个非常好的性能;Algebird是基于Scala开发的类库,其实现的布隆过滤器仅支持字符串作为元素类型,同样也采用了Murmur hash3,底层则是采用一种叫“EWAHCompressedBitmap”的数据结构,它专门为内存占用而优化,适合稀疏数据的场景,是一种可以替代BitSet的实现,不过缺点是随机访问的性能比较差;breeze是ScalaNLP下的核心类库,包括线性代数,数值计算和优化,是一个强大的机器学习工具,它实现的布隆过滤器没有使用通用的Murmur hash3算法,而是直接使用了对象的hash值,bit数组则是采用了BitSet,但是和Scala的通病一样,当编译成Java代码时分配了过多的对象,这会在内存占用上带来额外的开销。
下面我们就Guava类库中实现布隆过滤器的源码作详细分析,最后出于灵活性和解耦等因素的考虑,我们想要把布隆过滤器从JVM中拿出来,于是利用了Redis自带的Bitmaps作为底层的bit数组进行重构,另外随着插入的元素越来越多,当实际数量远远大于创建时设置的预计数量时,布隆过滤器的误判率会越来越高,因此在重构的过程中增加了自动扩容的特性,最后通过测试验证其正确性。
二、布隆过滤器在Guava中的实现
Guava中,布隆过滤器的实现主要涉及到2个类,BloomFilter和BloomFilterStrategies,首先来看一下BloomFilter:
 /** The bit set of the BloomFilter (not necessarily power of 2!) */
  private final BitArray bits;

  /** Number of hashes per element */
  private final int numHashFunctions;

  /** The funnel to translate Ts to bytes */
  private final Funnel<? super T> funnel;

  /**
   * The strategy we employ to map an element T to {@code numHashFunctions} bit indexes.
   */
  private final Strategy strategy;
这是它的4个成员变量
- BitArrays是定义在BloomFilterStrategies中的内部类,封装了布隆过滤器底层bit数组的操作,后文详述;
- numHashFunctions表示哈希函数的个数,即上文提到的k;
- Funnel,这是Guava中定义的一个接口,它和PrimitiveSink配套使用,主要是把任意类型的数据转化成Java基本数据类型(primitive value,如char,byte,int……),默认用java.nio.ByteBuffer实现,最终均转化为byte数组;
- Strategy是定义在BloomFilter类内部的接口,代码如下,有3个方法,put(插入元素),mightContain(判定元素是否存在)和ordinal方法(可以理解为枚举类中那个默认方法)
interface Strategy extends java.io.Serializable {

    /**
     * Sets {@code numHashFunctions} bits of the given bit array, by hashing a user element.
     *
     * <p>Returns whether any bits changed as a result of this operation.
     */
    <T> boolean put(T object, Funnel<? super T> funnel, int numHashFunctions, BitArray bits);

    /**
     * Queries {@code numHashFunctions} bits of the given bit array, by hashing a user element;
     * returns {@code true} if and only if all selected bits are set.
     */
    <T> boolean mightContain(
        T object, Funnel<? super T> funnel, int numHashFunctions, BitArray bits);

    /**
     * Identifier used to encode this strategy, when marshalled as part of a BloomFilter. Only
     * values in the [-128, 127] range are valid for the compact serial form. Non-negative values
     * are reserved for enums defined in BloomFilterStrategies; negative values are reserved for any
     * custom, stateful strategy we may define (e.g. any kind of strategy that would depend on user
     * input).
     */
    int ordinal();
  }
对于创建布隆过滤器,BloomFilter并没有公有的构造函数,只有一个私有构造函数,而对外它提供了5个重载的create方法,在缺省情况下误判率设定为3%,采用BloomFilterStrategies.MURMUR128_MITZ_64的实现。其中4个create方法最终都调用了同一个create方法,由它来负责调用私有构造函数,其源码如下:
static <T> BloomFilter<T> create(
      Funnel<? super T> funnel, long expectedInsertions, double fpp, Strategy strategy) {
    checkNotNull(funnel);
    checkArgument(
        expectedInsertions >= 0, "Expected insertions (%s) must be >= 0", expectedInsertions);
    checkArgument(fpp > 0.0, "False positive probability (%s) must be > 0.0", fpp);
    checkArgument(fpp < 1.0, "False positive probability (%s) must be < 1.0", fpp);
    checkNotNull(strategy);

    if (expectedInsertions == 0) {
      expectedInsertions = 1;
    }
    /*
     * TODO(user): Put a warning in the javadoc about tiny fpp values, since the resulting size
     * is proportional to -log(p), but there is not much of a point after all, e.g.
     * optimalM(1000, 0.0000000000000001) = 76680 which is less than 10kb. Who cares!
     */
    long numBits = optimalNumOfBits(expectedInsertions, fpp);
    int numHashFunctions = optimalNumOfHashFunctions(expectedInsertions, numBits);
    try {
      return new BloomFilter<T>(new BitArray(numBits), numHashFunctions, funnel, strategy);
    } catch (IllegalArgumentException e) {
      throw new IllegalArgumentException("Could not create BloomFilter of " + numBits + " bits", e);
    }
  }
在create中接受了4个参数,funnel(输入的数据),expectedInsertions(预计插入的元素总数),fpp(期望误判率),strategy(实现Strategy的实例),然后它计算了bit数组的长度以及哈希函数的个数(公式参考前文),最后用numBits创建了BitArray,并调用了构造函数完成赋值操作。
static long optimalNumOfBits(long n, double p) {
    if (p == 0) {
      p = Double.MIN_VALUE;
    }
    return (long) (-n * Math.log(p) / (Math.log(2) * Math.log(2)));
  }

static int optimalNumOfHashFunctions(long n, long m) {
    // (m / n) * log(2), but avoid truncation due to division!
    return Math.max(1, (int) Math.round((double) m / n * Math.log(2)));
  }
接着再来看一下BloomFilterStrategies类,首先它是实现了BloomFilter.Strategy 接口的一个枚举类,其次它有两个2枚举值,MURMUR128_MITZ_32和MURMUR128_MITZ_64,分别对应了32位哈希映射函数,和64位哈希映射函数,后者使用了murmur3 hash生成的所有128位,具有更大的空间,不过原理是相通的,我们选择默认的MURMUR128_MITZ_64来分析:
MURMUR128_MITZ_64() {
    @Override
    public <T> boolean put(
        T object, Funnel<? super T> funnel, int numHashFunctions, BitArray bits) {
      long bitSize = bits.bitSize();
      byte[] bytes = Hashing.murmur3_128().hashObject(object, funnel).getBytesInternal();
      long hash1 = lowerEight(bytes);
      long hash2 = upperEight(bytes);

      boolean bitsChanged = false;
      long combinedHash = hash1;
      for (int i = 0; i < numHashFunctions; i++) {
        // Make the combined hash positive and indexable
        bitsChanged |= bits.set((combinedHash & Long.MAX_VALUE) % bitSize);
        combinedHash += hash2;
      }
      return bitsChanged;
    }

    @Override
    public <T> boolean mightContain(
        T object, Funnel<? super T> funnel, int numHashFunctions, BitArray bits) {
      long bitSize = bits.bitSize();
      byte[] bytes = Hashing.murmur3_128().hashObject(object, funnel).getBytesInternal();
      long hash1 = lowerEight(bytes);
      long hash2 = upperEight(bytes);

      long combinedHash = hash1;
      for (int i = 0; i < numHashFunctions; i++) {
        // Make the combined hash positive and indexable
        if (!bits.get((combinedHash & Long.MAX_VALUE) % bitSize)) {
          return false;
        }
        combinedHash += hash2;
      }
      return true;
    }
抽象来看,put是写,mightContain是读,两个方法的代码有一点相似,都是先利用murmur3 hash对输入的funnel计算得到128位的字节数组,然后高低分别取8个字节(64位)创建2个long型整数hash1,hash2作为哈希值。循环体内采用了2个函数模拟其他函数的思想,即上文提到的gi(x) = h1(x) + ih2(x) ,这相当于每次累加hash2,然后通过基于bitSize取模的方式在bit数组中索引。
这里之所以要和Long.MAX_VALUE进行按位与的操作,是因为在除数和被除数符号不一致的情况下计算所得的结果是有差别的,在程序语言里,“%”准确来说是取余运算(C,C++和Java均如此,python是取模),如-5%3=-2,而取模的数学定义是x mod y=x-y[x/y](向下取整),所以-5 mod 3= -5-3*(-2)=1,因此当哈希值为负数的时候,其取余的结果为负(bitSize始终为正数),这样就不方便在bit数组中取值,因此通过Long.MAX_VALUE(二进制为0111…1111),直接将开头的符号位去掉,从而转变为正数。当然也可以取绝对值,在另一个MURMUR128_MITZ_32的实现中就是这么做的。
在put方法中,先是将索引位置上的二进制置为1,然后用bitsChanged记录插入结果,如果返回true表明没有重复插入成功,而mightContain方法则是将索引位置上的数值取出,并判断是否为0,只要其中出现一个0,那么立即判断为不存在。
最后再说一下底层bit数组的实现,主要代码如下:
 static final class BitArray {
    final long[] data;
    long bitCount;

    BitArray(long bits) {
      this(new long[Ints.checkedCast(LongMath.divide(bits, 64, RoundingMode.CEILING))]);
    }

    // Used by serialization
    BitArray(long[] data) {
      checkArgument(data.length > 0, "data length is zero!");
      this.data = data;
      long bitCount = 0;
      for (long value : data) {
        bitCount += Long.bitCount(value);
      }
      this.bitCount = bitCount;
    }

    /** Returns true if the bit changed value. */
    boolean set(long index) {
      if (!get(index)) {
        data[(int) (index >>> 6)] |= (1L << index);
        bitCount++;
        return true;
      }
      return false;
    }

    boolean get(long index) {
      return (data[(int) (index >>> 6)] & (1L << index)) != 0;
    }

    /** Number of bits */
    long bitSize() {
      return (long) data.length * Long.SIZE;
    }
...
}
之前也提到了Guava没有使用java.util.BitSet,而是封装了一个long型的数组,另外还有一个long型整数,用来统计数组中已经占用(置为1)的数量,在第一个构造函数中,它把传入的long型整数按长度64分段(例如129分为3段),段数作为数组的长度,你可以想象成由若干个64位数组拼接成一个超长的数组,它的长度就是64乘以段数,即bitSize,在第二个构造函数中利用Long.bitCount方法来统计对应二进制编码中的1个数,这个方法在JDK1.5中就有了,其算法设计得非常精妙,有精力的同学可以自行研究。
另外两个重要的方法是set和get,在get方法中,参考put和mightContain方法,传入的参数index是经过bitSize取模的,因此一定能落在这个超长数组的范围之内,为了获取index对应索引位置上的值,首先将其无符号右移6位,并且强制转换成int型,这相当于除以64向下取整的操作,也就是换算成段数,得到该段上的数值之后,又将1左移index位,最后进行按位与的操作,如果结果等于0,那么返回false,从而在mightContain中判断为不存在。在set方法中,首先调用了get方法判断是否已经存在,如果不存在,则用同样的逻辑取出data数组中对应索引位置的数值,然后按位或并赋值回去。
到这里,对Guava中布隆过滤器的实现就基本讨论完了,简单总结一下:
- BloomFilter类的作用在于接收输入,利用公式完成对参数的估算,最后初始化Strategy接口的实例;
- BloomFilterStrategies是一个枚举类,具有两个实现了Strategy接口的成员,分别为MURMUR128_MITZ_32和MURMUR128_MITZ_64,另外封装了long型的数组作为布隆过滤器底层的bit数组,其中在get和set方法中完成核心的位运算。
三、利用Redis Bitmaps进行重构
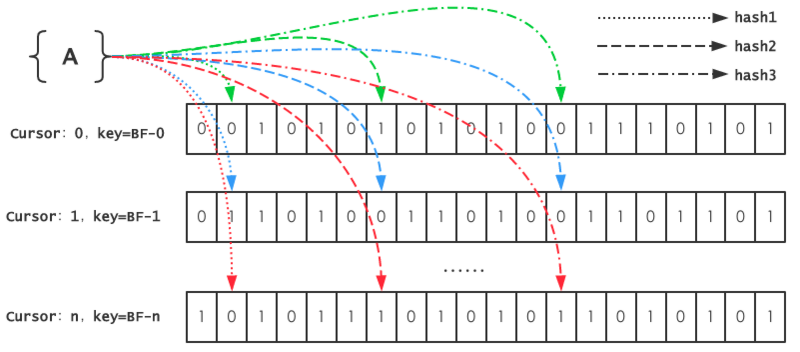
通过上面的分析,主要算法和逻辑的部分大体都是一样的,真正需要重构的部分是底层位数组的实现,在Guava中是封装了一个long型的数组,而对于redis来说,本身自带了Bitmaps的“数据结构”(本质上还是一个字符串),已经提供了位操作的接口,因此重构本身并不复杂,相对比较复杂的是,之前提到的实现自动扩容特性。
这里实现自动扩容的思想是,在redis中记录一个自增的游标cursor,如果当前key对应的Bitmaps已经达到饱和状态,则cursor自增,同时用其生成一个新的key,并创建规模同等的Bitmaps。然后在get的时候,需要判断该元素是否存在于任意一个Bitmaps中。于是整个的逻辑就变成,一个元素在每个Bitmaps中都不存在时,才能插入当前cursor对应key的Bitmaps中。
下面是代码的实现部分。
首先,为了简化redis的操作,定义了2个函数式接口,分别执行单条命令和pipeline,另外还实现了一个简单的工具类
@FunctionalInterface
public interface JedisExecutor<T> {
    T execute(Jedis jedis);
}

@FunctionalInterface
public interface PipelineExecutor {
    void load(Pipeline pipeline);
}

public class JedisUtils {

    private static final GenericObjectPoolConfig poolConfig = new GenericObjectPoolConfig();

    private JedisPool jedisPool;

    public JedisUtils() {
        jedisPool = new JedisPool(poolConfig, "localhost", 6379);
    }

    public <T> T execute(JedisExecutor<T> jedisExecutor) {
        try (Jedis jedis = jedisPool.getResource()) {
            return jedisExecutor.execute(jedis);
        }
    }

    public List<Object> pipeline(List<PipelineExecutor> pipelineExecutors) {
        try (Jedis jedis = jedisPool.getResource()) {
            Pipeline pipeline = jedis.pipelined();
            for (PipelineExecutor executor : pipelineExecutors)
                executor.load(pipeline);
            return pipeline.syncAndReturnAll();
        }
    }
}
其次在Strategy中,对put和mightContain作了一点修改,其中被注释的部分是Guava中的实现。为了简化,这里我们只接受String对象。
这里先把所有的随机函数对应的索引位置收集到一个数组中,然后交由底层的RedisBitmaps处理get或set,具体过程后面会详细说明。
bits.ensureCapacityInternal()方法,即表示自动扩容,这个函数名是从ArrayList中搬过来的。
    @Override
    public boolean put(String string, int numHashFunctions, RedisBitmaps bits) {
        long bitSize = bits.bitSize();
        byte[] bytes = Hashing.murmur3_128().hashString(string, Charsets.UTF_8).asBytes();
        long hash1 = lowerEight(bytes);
        long hash2 = upperEight(bytes);

        boolean bitsChanged = false;
        long combinedHash = hash1;
//        for (int i = 0; i < numHashFunctions; i++) {
//            bitsChanged |= bits.set((combinedHash & Long.MAX_VALUE) % bitSize);
//            combinedHash += hash2;
//        }
        long[] offsets = new long[numHashFunctions];
        for (int i = 0; i < numHashFunctions; i++) {
            offsets[i] = (combinedHash & Long.MAX_VALUE) % bitSize;
            combinedHash += hash2;
        }
        bitsChanged = bits.set(offsets);
        bits.ensureCapacityInternal();//自动扩容
        return bitsChanged;
    }

    @Override
    public boolean mightContain(String object, int numHashFunctions, RedisBitmaps bits) {
        long bitSize = bits.bitSize();
        byte[] bytes = Hashing.murmur3_128().hashString(object, Charsets.UTF_8).asBytes();
        long hash1 = lowerEight(bytes);
        long hash2 = upperEight(bytes);
        long combinedHash = hash1;
//        for (int i = 0; i < numHashFunctions; i++) {
//            if (!bits.get((combinedHash & Long.MAX_VALUE) % bitSize)) {
//                return false;
//            }
//            combinedHash += hash2;
//        }
//        return true;
        long[] offsets = new long[numHashFunctions];
        for (int i = 0; i < numHashFunctions; i++) {
            offsets[i] = (combinedHash & Long.MAX_VALUE) % bitSize;
            combinedHash += hash2;
        }
        return bits.get(offsets);
    }
最后,也是最重要的RedisBitmaps,其中bitSize用了Guava布隆过滤器中计算Long型数组长度的方法,得到bitSize之后使用setbit命令初始化一个全部为0的位数组。get(long offset)和set(long offset),这两个与Guava布隆过滤器中的逻辑类似,这里就不再赘述了,而get(long[] offsets)方法中,所有的offset要与每一个cursor对应的Bitmaps进行判断,若全部命中,那么这个元素就可能存在于该Bitmaps,反之若不能完全命中,则表示该元素不存在于任何一个Bitmaps,所以当满足这个条件,在set(long[] offsets)方法中,就可以插入到当前key的Bitmaps中了。
在ensureCapacityInternal方法,判断需要扩容的条件是bitCount*2>bitSize,bitCount表示一个Bitmaps中“1”出现的个数,也就是当“1”出现的个数超过总数的一半时,进行扩容操作——首先使用incr命令对cursor自增,然后使用新的key创建一个新的Bitmaps。
class RedisBitmaps {

    private static final String BASE_KEY = "bloomfilter";
    private static final String CURSOR = "cursor";

    private JedisUtils jedisUtils;
    private long bitSize;

    RedisBitmaps(long bits) {
        this.jedisUtils = new JedisUtils();
        this.bitSize = LongMath.divide(bits, 64, RoundingMode.CEILING) * Long.SIZE;//位数组的长度,相当于n个long的长度
        if (bitCount() == 0) {
            jedisUtils.execute((jedis -> jedis.setbit(currentKey(), bitSize - 1, false)));
        }
    }

   boolean get(long[] offsets) {
        for (long i = 0; i < cursor() + 1; i++) {
            final long cursor = i;
            //只要有一个cursor对应的bitmap中,offsets全部命中,则表示可能存在
            boolean match = Arrays.stream(offsets).boxed()
                    .map(offset -> jedisUtils.execute(jedis -> jedis.getbit(genkey(cursor), offset)))
                    .allMatch(b -> (Boolean) b);
            if (match)
                return true;
        }
        return false;
    }

    boolean get(final long offset) {
        return jedisUtils.execute(jedis -> jedis.getbit(currentKey(), offset));
    }

    boolean set(long[] offsets) {
        if (cursor() > 0 && get(offsets)) {
            return false;
        }
        boolean bitsChanged = false;
        for (long offset : offsets)
            bitsChanged |= set(offset);
        return bitsChanged;
    }

    boolean set(long offset) {
        if (!get(offset)) {
            jedisUtils.execute(jedis -> jedis.setbit(currentKey(), offset, true));
            return true;
        }
        return false;
    }

    long bitCount() {
        return jedisUtils.execute(jedis -> jedis.bitcount(currentKey()));
    }

    long bitSize() {
        return this.bitSize;
    }

    private String currentKey() {
        return genkey(cursor());
    }

    private String genkey(long cursor) {
        return BASE_KEY + "-" + cursor;
    }

    private Long cursor() {
        String cursor = jedisUtils.execute(jedis -> jedis.get(CURSOR));
        return cursor == null ? 0 : Longs.tryParse(cursor);
    }

    void ensureCapacityInternal() {
        if (bitCount() * 2 > bitSize())
            grow();
    }

    void grow() {
        Long cursor = jedisUtils.execute(jedis -> jedis.incr(CURSOR));
        jedisUtils.execute((jedis -> jedis.setbit(genkey(cursor), bitSize - 1, false)));
    }

    void reset() {
        String[] keys = LongStream.range(0, cursor() + 1).boxed().map(this::genkey).toArray(String[]::new);
        jedisUtils.execute(jedis -> jedis.del(keys));
        jedisUtils.execute(jedis -> jedis.set(CURSOR, "0"));
        jedisUtils.execute(jedis -> jedis.setbit(currentKey(), bitSize - 1, false));
    }

    private PipelineExecutor apply(PipelineExecutor executor) {
        return executor;
    }
}
下面我们做一个单元测试来验证其正确性。
如果我们插入的数量等于原预计总数,RedisBloomFilter扩容了1次,而两个布隆过滤器的结果一致,都为false,true,false。
如果插入的数量为原预计总数的3倍,RedisBloomFilter扩容了3次,并且仍判断正确,而Guava布隆过滤器则在判断str3时出现误判。
public class TestRedisBloomFilter {

    private static final int TOTAL = 10000;
    private static final double FPP = 0.0005;

    @Test
    public void test() {
        RedisBloomFilter redisBloomFilter = RedisBloomFilter.create(TOTAL, FPP);
        redisBloomFilter.resetBitmap();
        BloomFilter<String> bloomFilter = BloomFilter.create(Funnels.stringFunnel(Charsets.UTF_8), TOTAL, FPP);

        IntStream.range(0, /* 3* */TOTAL).boxed()
                .map(i -> Hashing.md5().hashInt(i).toString())
                .collect(toList()).forEach(s -> {
            redisBloomFilter.put(s);
            bloomFilter.put(s);
        });

        String str1 = Hashing.md5().hashInt(99999).toString();
        String str2 = Hashing.md5().hashInt(9999).toString();
        String str3 = "abcdefghijklmnopqrstuvwxyz123456";
        System.out.println(redisBloomFilter.mightContain(str1) + ":" + bloomFilter.mightContain(str1));
        System.out.println(redisBloomFilter.mightContain(str2) + ":" + bloomFilter.mightContain(str2));
        System.out.println(redisBloomFilter.mightContain(str3) + ":" + bloomFilter.mightContain(str3));
    }
}
>>
grow bloomfilter-1
false:false
true:true
false:false
>>
grow bloomfilter-1
grow bloomfilter-2
grow bloomfilter-3
false:false
true:true
false:true
综上,本文利用了Guava布隆过滤器的思想,并结合Redis中的Bitmaps等特性实现了支持动态扩容的布隆过滤器,它将布隆过滤器底层的位数据装载到了Redis数据库中,这样的好处在于可以部署在更复杂的多应用或分布式系统中,还可以利用Redis完成持久化,定时过期等功能。
四、参考文献
- 吴军. 数学之美[M]. 人民邮电出版社, 2012.
- Kirsch A, Mitzenmacher M. Less hashing, same performance: building a better bloom filter[C]//ESA. 2006, 6: 456-467.
- Bloom Filters for the Perplexed, https://sagi.io/2017/07/bloom-filters-for-the-perplexed/
- Google Guava, https://github.com/google/guava
